This document outlines a step-by-step process to install and host your own instance of The Misinformation Game. At the end of this guide, you will have hosted your own instance of The Misinformation Game to run studies.
This guide is aimed to require less technical knowledge than the technical installation guide, and as such it requires more time. If you are comfortable installing software and using the command line, then the technical installation guide will likely be easier and quicker to follow.
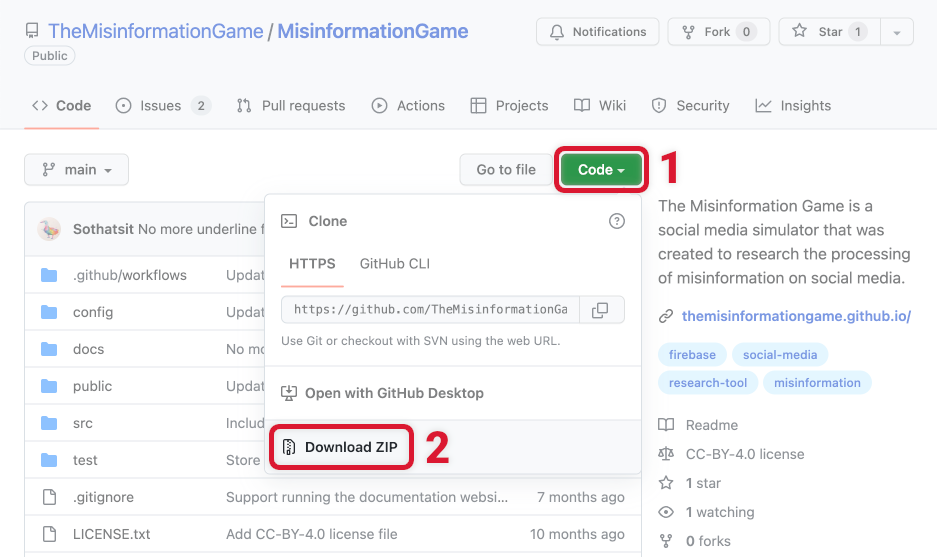
The Misinformation Game must be deployed using its source code. To download and save the codebase onto your device, you can access it from GitHub. The buttons you need to click to download the source code are highlighted in Figure 1.
Step 1: Open the MisinformationGame repository on GitHub.
Step 2: Click the green Code button at the top right. This should open a ‘Clone’ menu, as shown in Figure 1.
Step 3: Click the Download ZIP button from the ‘Clone’ menu. This should start a download of the source code of The Misinformation Game.
Step 4: Extract the ZIP archive to a directory on your computer (the specific directory does not matter).
Step 5: You should now have a directory in your file system that contains the source code of The Misinformation Game! This will be used in later steps to configure and deploy your own Misinformation Game instance.
If you already have Visual Studio Code installed, then you may skip this step.
This guide uses Visual Studio Code (VSCode) to allow you to access and modify the source code, and to allow you to run command-line scripts in a cross-platform way. This section describes the process to install VSCode on Windows, although the process should be similar on Mac or Linux. In-depth guides to install VSCode can also be found for most operating systems in the official VSCode documentation.
Step 1: Download Visual Studio Code from the VSCode downloads page.
Step 2: Open the downloaded file to begin the installation process.
Step 3: Read the license agreement and click Next if you agree.
Step 4: On the Select Destination Location page, click Next.
Step 5: On the Select Start Menu Folder page, click Next.
Step 6: On the Additional Tasks page, select Add to PATH (requires shell restart), and then click Next.
Step 7: On the Ready to Install page, click Install.
Step 8: Wait for the installation to complete. If no errors are displayed, then you have successfully installed VSCode!
The next step in the process is to download Node.js and NPM. Node.js is required to run the installation code, and NPM is required to install the dependencies of The Misinformation Game. These tools can both be installed at once using the Node.js installer.
Step 1: Download the Node.js installer from https://nodejs.org/en/download/. Select the platform-specific installer you require by clicking the Windows Installer or the macOS Installer buttons on the download page. Additional operating system installers are listed further down the page.
Step 2: Open the downloaded file to begin the installation process. If you are asked whether you wish to run the software, accept by clicking Run.
Step 3: On the Introduction page, begin the installation by clicking Next.
Step 4: Read the license agreement and click Next if you agree.
Step 5: On the Installation Location page, click Next.
Step 6: The next page will ask you to select the components that you wish to install. The default selections include all the components we require, so click Next.
Step 7: Click Install. Once the installation finishes, click Finish.
You may verify that Node.js and NPM were successfully installed through the command line.
Step 1: Open a command-line program,
Step 2: Verify that Node.js installed correctly by typing the command node -v followed
by pressing enter. This command should output the version of Node.js that was installed
(e.g. v14.17.4). If it displays an error, then Node.js may not have been installed correctly.
Step 3: Verify that NPM installed correctly by typing the command npm -v followed
by pressing enter. This command should output the version of NPM that was installed
(e.g. 6.14.14). If it displays an error, then NPM may not have been installed correctly.
Firebase is a technology platform made by Google, which provides a platform to host websites. The Misinformation Game makes use of Firebase for its hosting, authentication, and data storage. Therefore, to host your instance of The Misinformation Game, you will need to create your own Firebase instance to host the game. A Google account is required in order to use Firebase. If you do not have a Google account, you can create one at https://accounts.google.com/signup/v2/webcreateaccount.
Step 1: Sign in to the Firebase Console using your Google account.
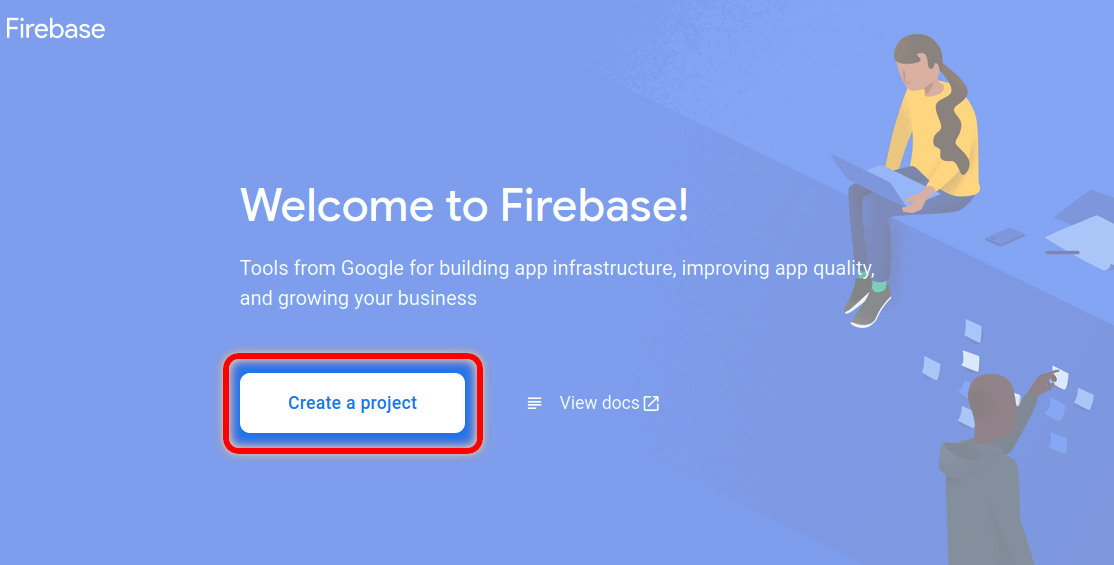
Step 2: Once you have signed in, you should see a similar page as shown in Figure 2. If you do not see this page, then you should be able to access it at https://console.firebase.google.com. On this page, click Create a project. If you have previously created a Firebase project, then you will need to click Add project instead.
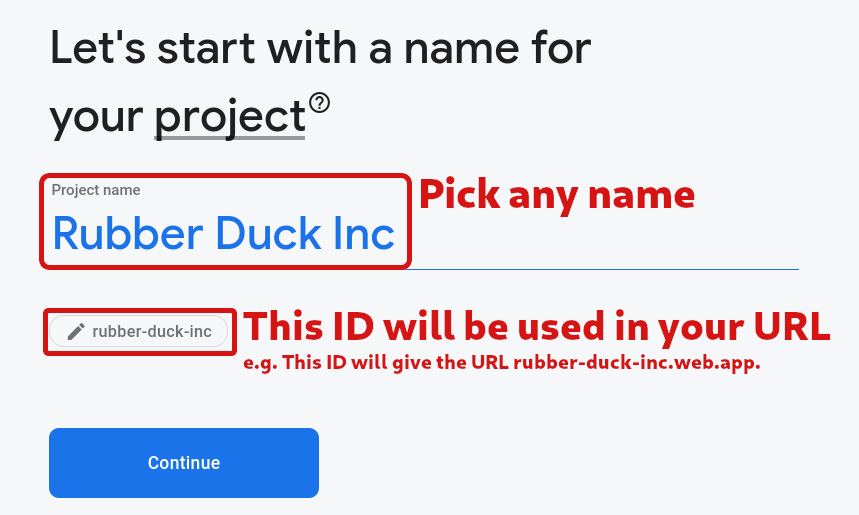
Step 3: You should now be shown a form asking you to enter the name for your new project. Enter a name for your project. The name of your project will be used to determine the URL that your study participants will access. Therefore, you may wish to choose an ambiguous name, so that participants are not influenced by the URL. The name and ID fields are highlighted in Figure 3. Once you have selected a name, click Continue.
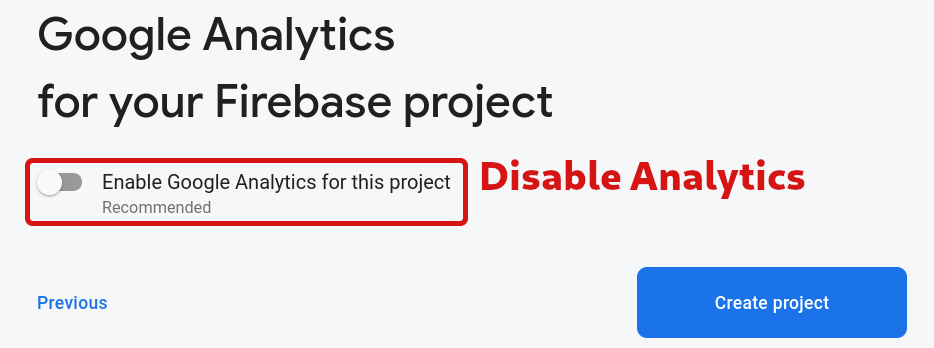
Step 4: In the next step you can choose to disable Google Analytics. We recommend that you disable it, as it doesn’t provide any functionality that is used by The Misinformation Game. The toggle to disable Google Analytics is highlighted in Figure 4.
Step 5: Click Create project. You have now created a Firebase project that can be used to host The Misinformation Game. However, some additional set-up is still required to deploy the source code of The Misinformation Game to your new project.
The Misinformation Game uses Firebase’s Firestore Database to store users, studies, and study results. Therefore, you will need to enable it.
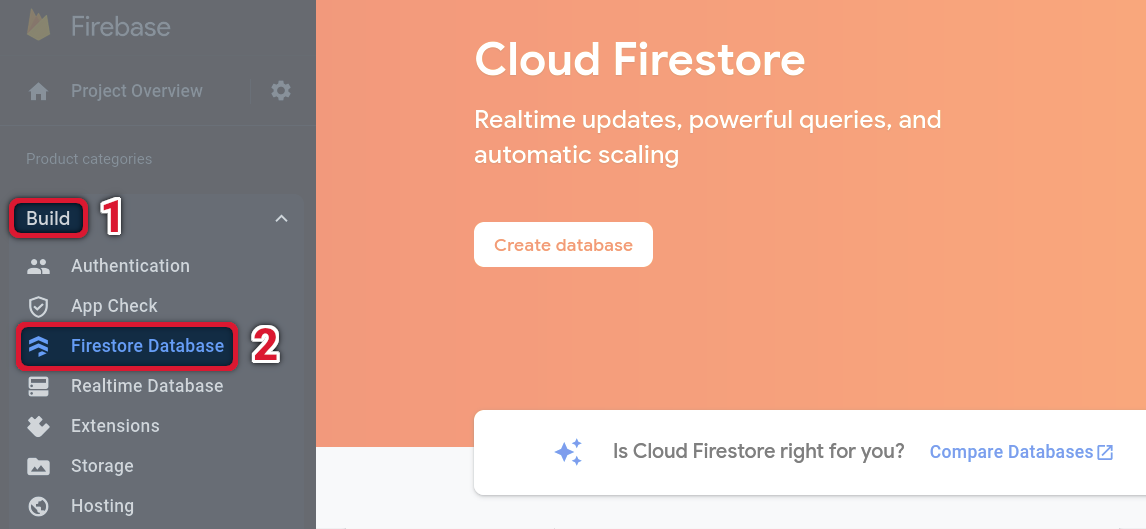
Step 1: Select Firestore Database under the Build tab on the left of the project page. The buttons to click are highlighted in Figure 5.
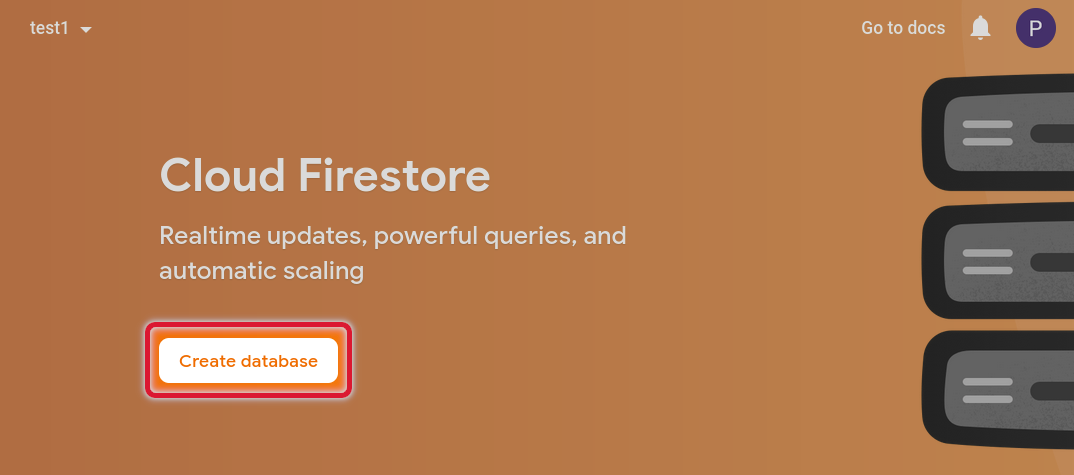
Step 2: On the Cloud Firestore page, click the Create database button. This button is shown in Figure 6. If a table is shown instead (as in Figure 7), then the Firestore database has already been enabled.
Step 3: You will be asked what rules you would like to set for the project’s database. These will be configured later in the installation process, so select Start in production mode and click Next.
Step 4: You will be asked to select the geographical location for where your database should be hosted. Select the geographical location that is closest to you and your participants. This selection does not restrict who can access your instance, but instead just helps to speed up access to the site by hosting it closer to you. Once you have selected a location, click Enable.
Step 5: Your database should now be ready to go. You should now see a page similar to the page shown in Figure 7.

Any images that are embedded within studies will be stored within Firebase Storage. Therefore, Firebase Storage will need to be enabled for your Firebase project.
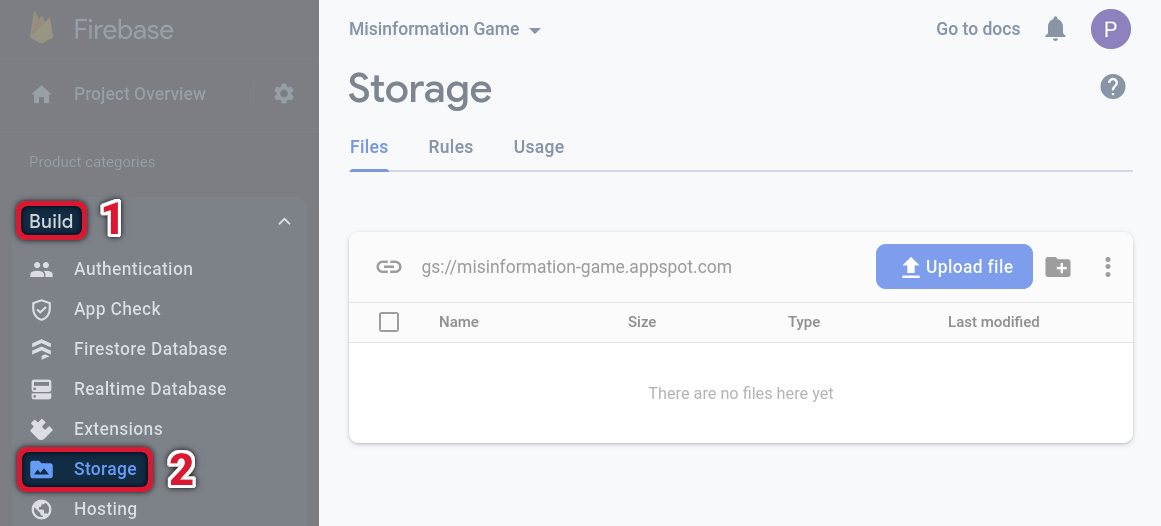
Step 1: Select Storage under the Build tab on the left of the project page. The buttons to click are highlighted in Figure 8.
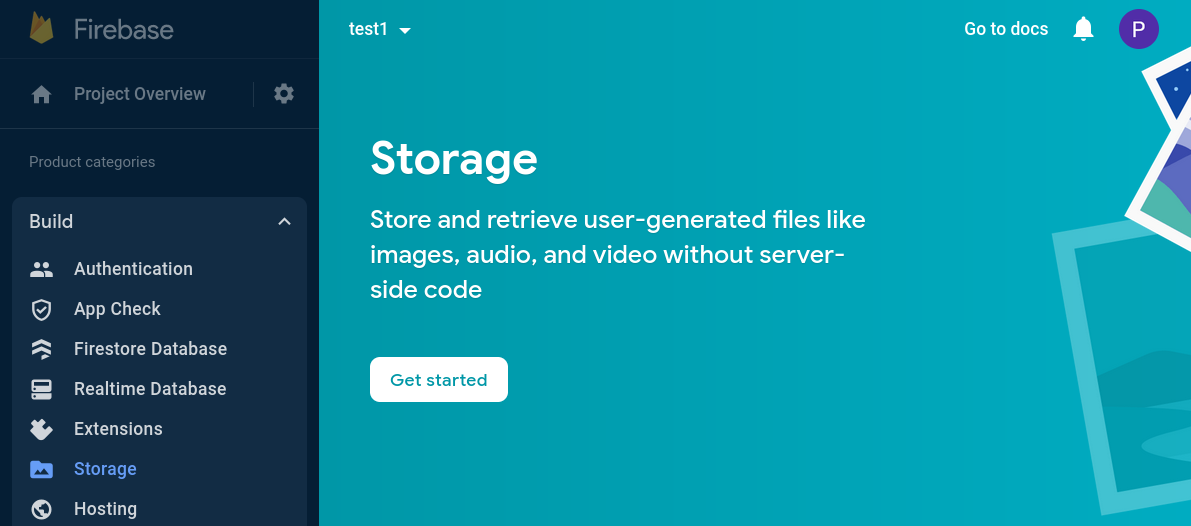
Step 2: Your storage should now be set up. If you see a page that looks like the page shown in Figure 8, then this has been successful. However, if you see the Get started page as shown in Figure 9, then you will need to first enable the Firestore Database as explained in the Enable Firebase Firestore section of this guide. This should automatically enable Firebase Storage when you start Firestore in production mode.
The Misinformation Game uses Firebase Authentication to authenticate administrators. Administrators are the users that are given access to upload studies and download their results. This authentication is not used for participants in your studies.
Step 1: Select Authentication under the Build tab on the left of the project page. The option to select is shown in Figure 10 below.
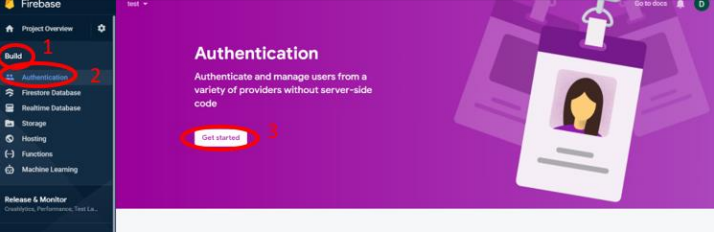
Step 2: Click Get started.
Step 3: You will be asked to select the Sign-In method that you would look to enable. Click on the ‘Google’ icon, as we will be making use of Google accounts for authentication.
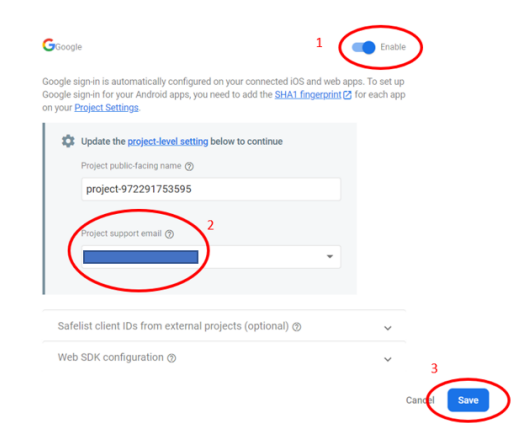
Step 4: After you click on the Google icon, you will be shown more options. First, click Enable, as shown in Figure 11 below.
Step 5: You may now enter your own email under the Project Support Email field shown in Figure 11 below. This contact email is required by Google’s authentication service.
Step 6: Click the Save button, as shown in Figure 11 below.
Step 7: The next stage of authentication is to give yourself administrator rights. This step will be explained later in this guide, as it requires additional set-up to be performed first.
Firebase supports mobile apps as well as websites. We must configure the project as a web-app.
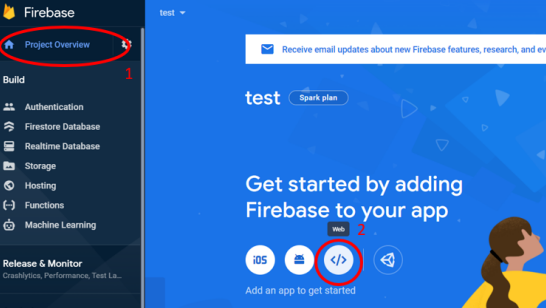
Step 1: Click Project Overview on the left of the project page, as shown in Figure 12.
Step 2: Click the Web icon, which is highlighted in Figure 12. The icon should resemble </>.
Step 3: Register your app by giving the app a name. Any name is okay. The “Hosting” settings can be ignored, as we will configure those separately later in this guide.
Step 4: Click Register App.
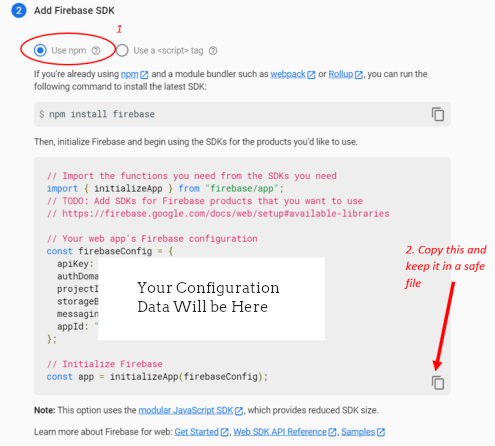
Step 5: You will be shown the Firebase SDK (software development kit) settings. Select “Use npm”.
Step 6: Copy the larger block of code to a text file on your computer. This configuration will be required to link The Misinformation Game to your project later. When it is required later, this code will be referred to as the “Configuration Information File”. There is a button in the bottom-right of this code block that can be pressed to copy it, as shown in Figure 13.
Step 7: Once you have saved the configuration information file, click Continue to console.
The next step of the process is to deploy The Misinformation Game to your Firebase project. This step will require the software that we installed earlier (Visual Studio Code, Node.js, and NPM).
Step 1: Open the Visual Studio Code app.
Step 2: Click on File > Open Folder and find the extracted project folder that you saved in section 2.1.
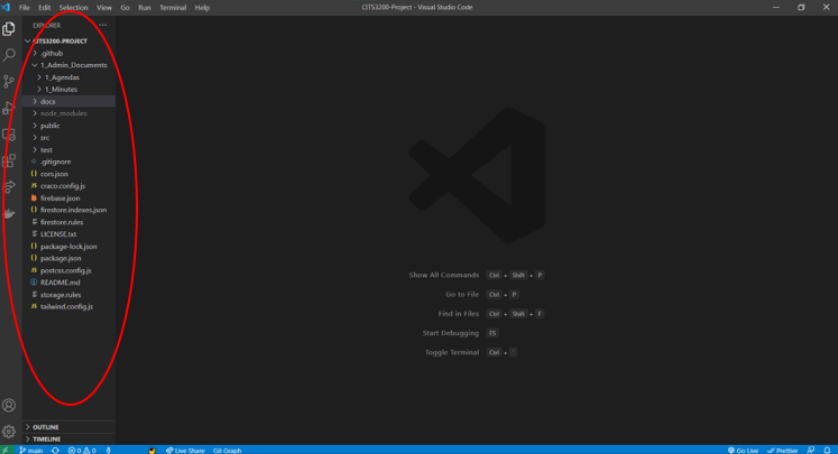
Step 3: Once the folder is open, you should see a screen similar to Figure 14. On the left
of the screen, you will notice the “Explorer” area. We will be using this section of the screen quite often.
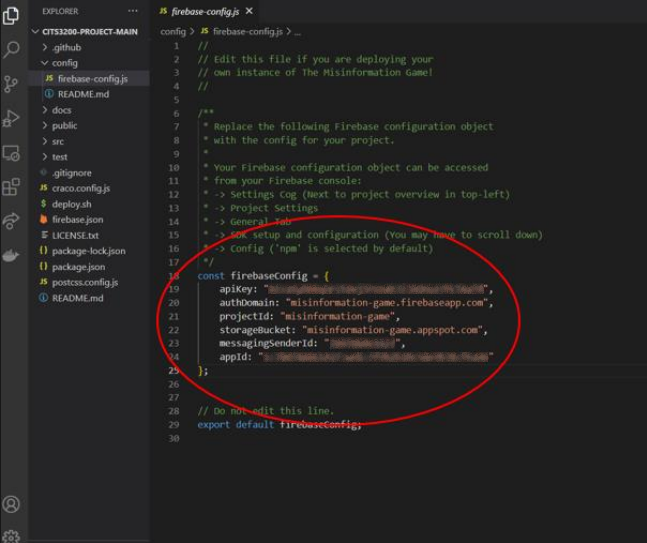
Step 4: In the “Explorer” section, click the “config” toggle and find and click on the “firebase-config.js” file. You should see a page like Figure 14.
Step 5: Replace the firebaseConfig information with your own information. This information is in the Configuration Information File, which was saved in section 5.4 of this guide. The area that you need to replace is circled in Figure 15.
Step 6: Finally, save the file by pressing Ctrl + S on your keyboard.
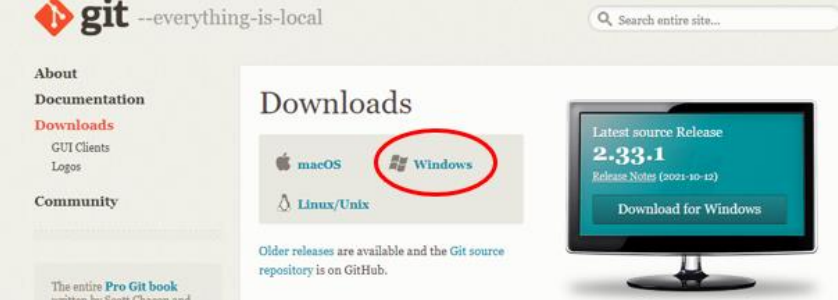
Windows users will also need to install Git Bash. You can download it from the below link, by clicking the Windows icon, as shown in Figure 16. https://git-scm.com/download/win
After downloading, double-click on the executable. Follow the installation process and do not change any of the default settings. After this you should have a working Git for Windows instance running on your computer.
Now the environment is completely set up and ready for you to edit and to deploy. To deploy a version of this application on the internet, follow the below steps.
Step 1: In the top toolbar of Visual Studio Code, click on Terminal > New Terminal. This will open at the bottom of the application and look like Figure 17.
Step 1.5: If you are on Windows, you will also need to change to the Git Bash terminal. As shown in Figure 18, first click on the down arrow and then select “Git Bash”.

This will open a terminal that looks like Figure 19.

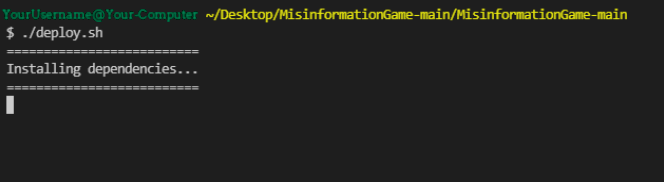
Step 2: In the terminal at the bottom of the screen run the following command: ./deploy.sh
You will now see text beginning to be displayed at the bottom of the terminal screen. This will be installing all the necessary packages and deploy the app. Please note that this process may take a while. See Figure 20 for an example.
During this deployment process you will be asked many questions which require a response. These questions
are as follows:
Question 1: You will be asked to login to your Google Firebase account. If you are not already logged
in, this will open a browser window. Please sign in to your Google Firebase account and return to Visual
Studio Code.
Question 2: You will be asked to select a Firebase Project. Select the relevant Firebase project made earlier
and then press Enter to continue. This is shown in Figure 21.
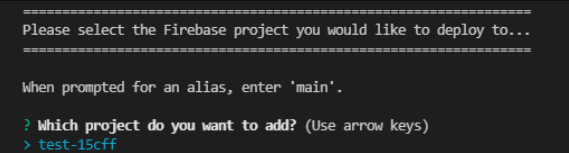
Question 3: You will be asked to give an alias to this project. This can be whatever you would like.
For example, “test”. Press Enter to continue.
Question 4: You will be asked to sign in to Google Cloud. Press Y and then Enter. This will open a
login page in your browser, please login with the same Google Account you are using for Firebase. After
this return to Visual Studio Code.
Question 5: You will be asked to select the cloud project. Press the number next to your project and
then press Enter to continue. This is shown in Figure 22.

Question 6: Next you will be asked to make a domain name.
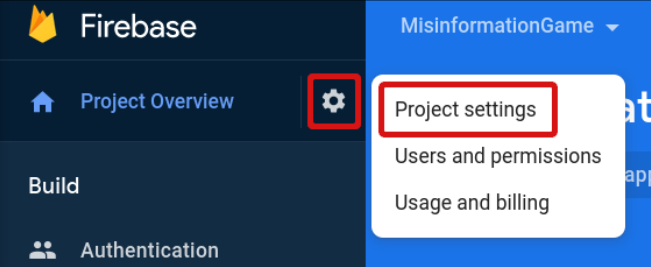
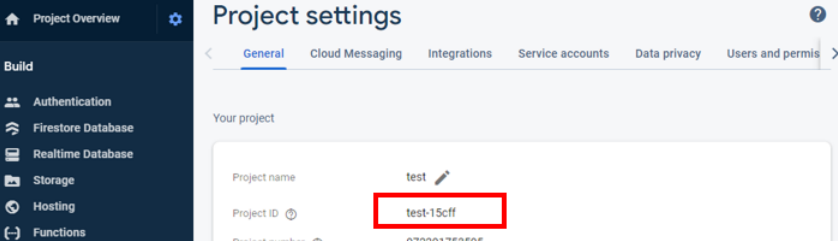
Before entering the URL, please note that the domain name must be your Firebase Project ID. You can get
the Project ID from Firebase by clicking on the “Gear” icon on the left and then on “Project Settings”.
Figure 23 and Figure 24 below demonstrates this.
The URL must be in the format of “

Step 4: The site is now fully deployed and ready to be accessed. You will see something similar to Figure 26.

You can now access the website on your browser at the domain [Your Project ID].web.app. [Your Project ID]” is the project ID obtained for question 6 above.
You should now have a fully deployed instance of The Misinformation Game! You may now sign in to your instance of The Misinformation Game, and register yourself as an administrator, through the process described in the Registering Administrators documentation.
Once you have registered yourself as an admin, then you can read more about uploading and managing your studies in the Managing Studies documentation. Additionally, information on configuring your studies can be found in the Study Configuration documentation. I hope The Misinformation Game proves useful for your research!
We share updates about the Misinformation Game in our Slack channel. If you wish to stay up-to-date, or if you’d like to share what you’re working on in relation to the Misinformation Game, please join our community on Slack!
Back to Top