In order for users to upload their own studies, they must first be registered as administrators. This document outlines the process for a user to be granted administrator privileges.
Users must register with your instance of The Misinformation Game before they can be registered as administrators. This must be done using a Google account. The process to register as a user is described below.
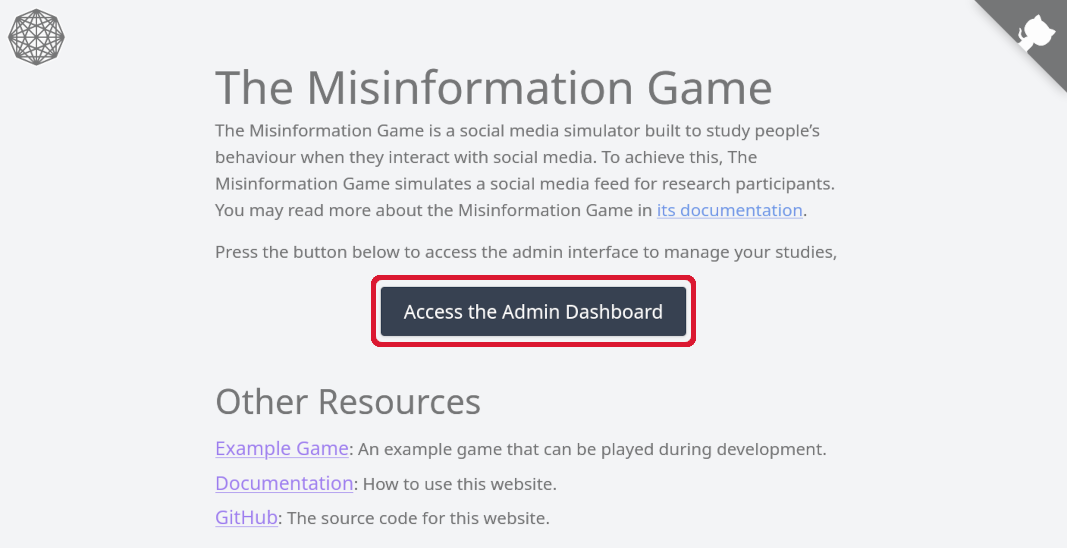
Step 1: First, the admin dashboard must be accessed from the homepage of your instance of The Misinformation Game. The button to access the dashboard from the homepage is highlighted in Figure 1.
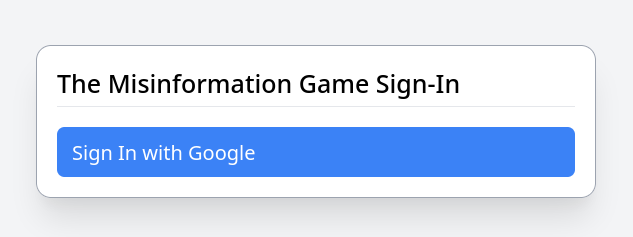
Step 2: You will then be prompted to sign in using a Google account. You should click the Sign In with Google button. A screenshot of the sign-in page is shown in Figure 2.
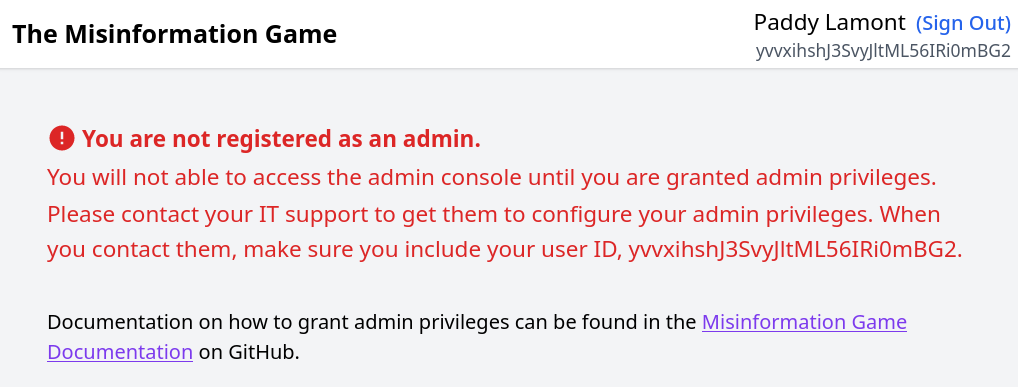
Step 3: You should be prompted to select a Google account to authenticate with. You should select the Google account that you wish to create studies with. You should then be redirected to the admin dashboard page. This page should display a permissions error similar to the one shown in Figure 3. If it does not, then you have already been granted administrator privileges.
Step 4: You have now been registered as a user, but not an administrator. The process to register users as administrators is described under the Admin Registration section below.
Administrators are registered by adding their User ID to a collection in the Firestore Database of your instance of The Misinformation Game. Therefore, before a user can be registered as an administrator, you will need to find their User ID. If you are finding your own User ID, then you may refer to the process in the Finding your own User ID section. If you are finding the User ID of another user, then you may refer to the process in the Finding another user’s User ID section.
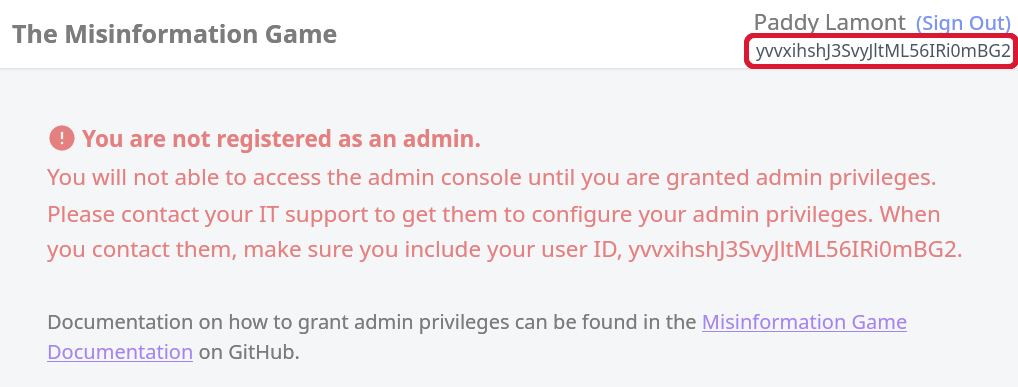
Your User ID is displayed in the top-right
of the admin dashboard underneath your name, as highlighted
in Figure 4. It should be a long string of letters
and numbers that looks similar to rdp1zSjlgiMTAj4t42ve4sE84CvL.
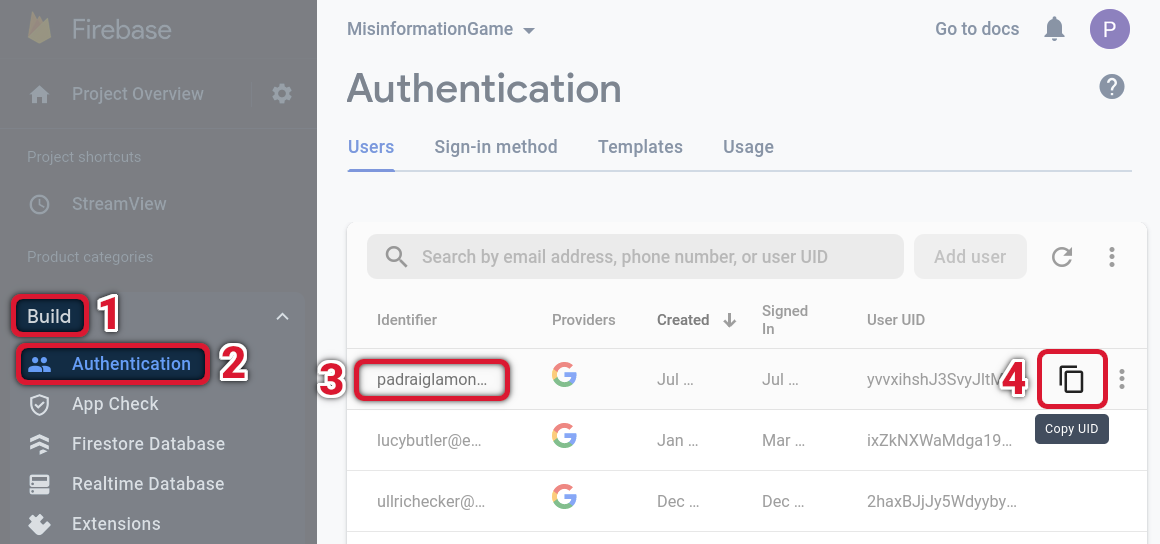
If you are registering another user as an administrator, then it may be easier
to obtain their User ID manually through the Firebase Console. This can be done
by accessing the Build -> Authentication tab on the left of the Firebase Console.
The users that have registered will be listed in a table, with their emails given
in the “Identifier” column. You should find the row with the email of the user that
you wish to register as an admin. If they do not appear in this table, then you may
ask them to register as described in the User Registration section.
Once you have found their row, then you can click the “Copy UID” button to the right
of the table to copy their User ID into your clipboard. This User ID should look similar
to rdp1zSjlgiMTAj4t42ve4sE84CvL. The User ID will be used in later sections to register the
user as an admin. The process to find User IDs through the Firebase Console is shown
in Figure 5.
Administrators must be manually registered through the Firebase Console for your instance of The Misinformation Game. The process to do this is described in the sections below.
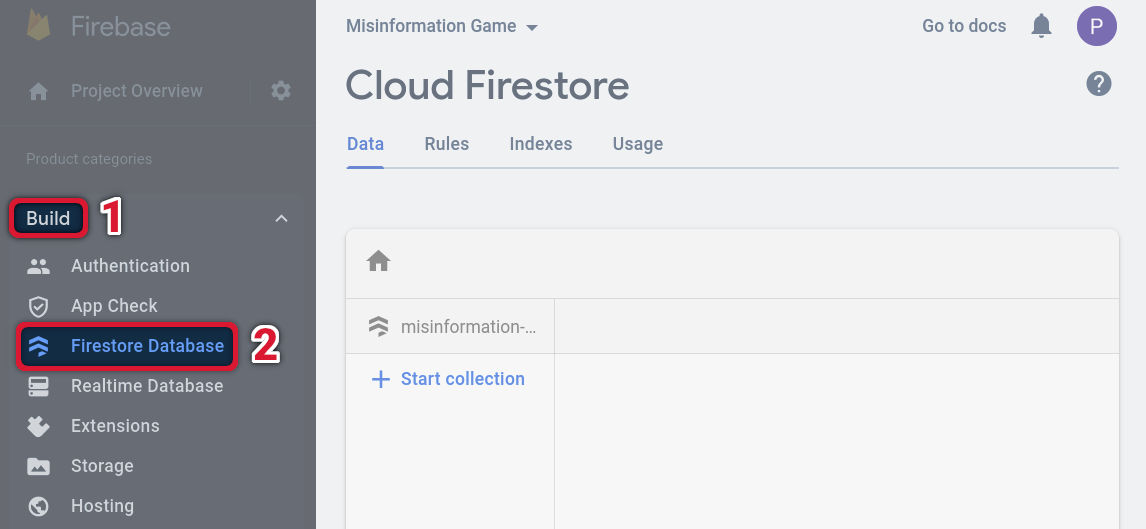
Administrators are registered by manually adding entries to the Firestore database. The Firestore database can be accessed through the Build -> Firestore Database tab on the lefthand side of your Firebase console. The process to access this tab is shown in Figure 6.
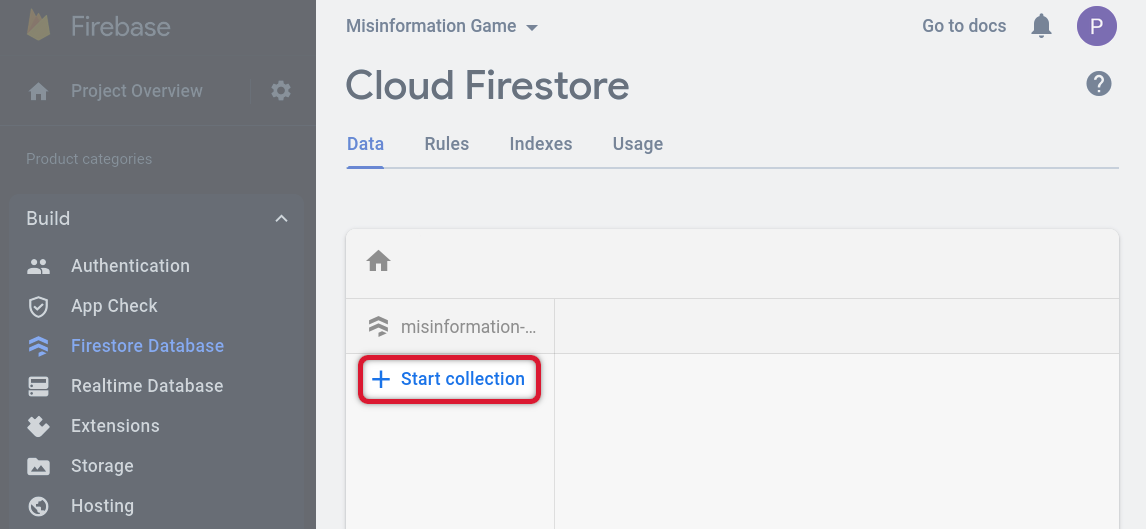
When you register your first administrator, you must create the “Admins” collection within your Firestore database. The process to do this is described below. If you already have an “Admins” collection, then you should follow the process in the Registering Additional Administrators section instead.
Step 1: In the Firestore Database, press the “+ Start collection” button to create your first Firestore collection. This button is highlighted in Figure 7. This should open a dialog prompting you to “Start a collection”.
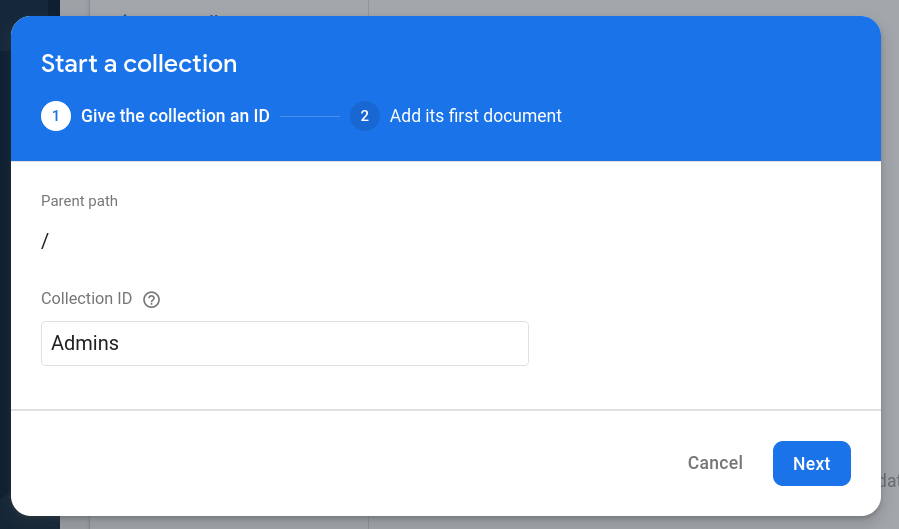
Step 2: You will be prompted to enter an ID for the new collection.
You should enter Admins for the Collection ID, as shown in Figure 8.
The case of the letters in the Collection ID is important, and must match
the example provided. You may now press “Next” to advance to adding the
first administrator.
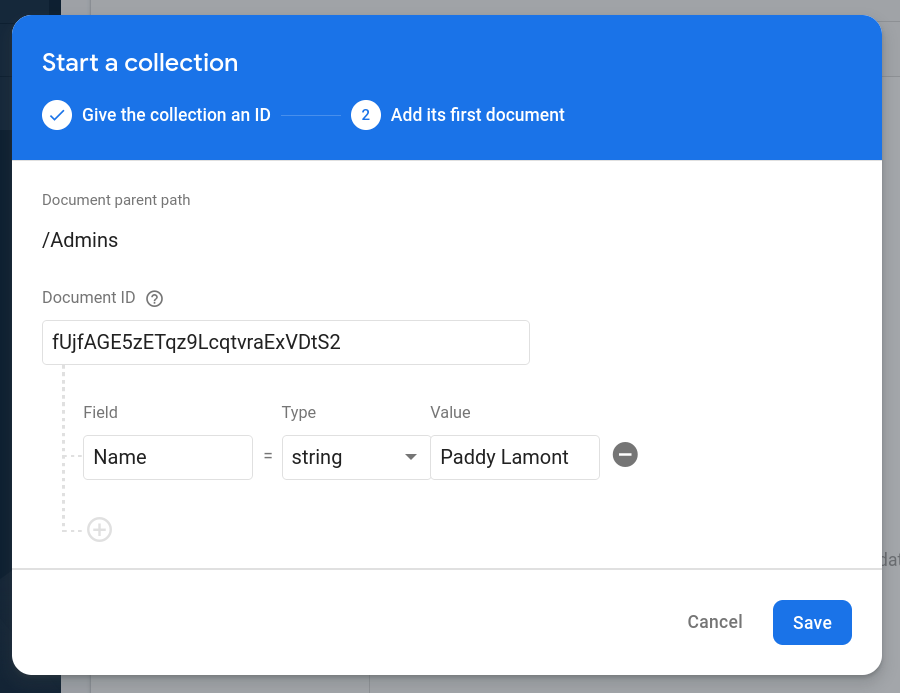
Step 3: You will then be prompted to add the first document to the Admins collection. The first document that we will add is the first administrator of your instance of The Misinformation Game. An example of this form correctly filled in is shown in Figure 9.
You should enter the User ID you copied earlier as the “Document ID”. Your User ID can be found using the process described under the Finding your User ID section. This will allow The Misinformation Game to verify that you are an administrator.
Next, you should enter Name under “Field”, and your name under “Value”. The “Type”
field should be set to string. This name will later help to keep track of who has been
granted administrator privileges.
Once you have set the admin name, save the collection. “Admins” should now be displayed as a collection in your Firestore Database.
Step 4: You should now be able to access your admin dashboard. To do so, reload the admin dashboard (as shown in Figure 3) and the permission error should be gone. You may now upload and manage your studies as described in the Managing Studies documentation!
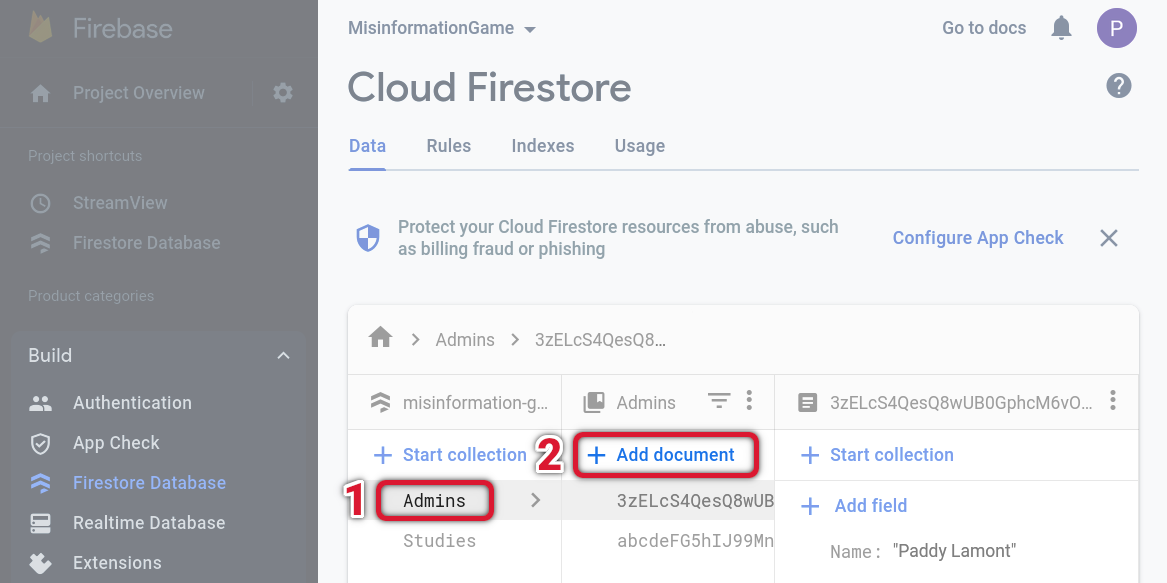
Once an administrator has been added to your instance of The Misinformation Game, the Admins collection will have already been created in your Firestore database. This section will describe how to add a new document to that collection to register a new user as an administrator. If you do not see an Admins collection in your Firestore Database as shown in Figure 10, then you should follow the process in the Registering the First Administrator section instead.
Step 1: Select the Admins collection in the Firestore database and click “Add document”, as shown in Figure 10.
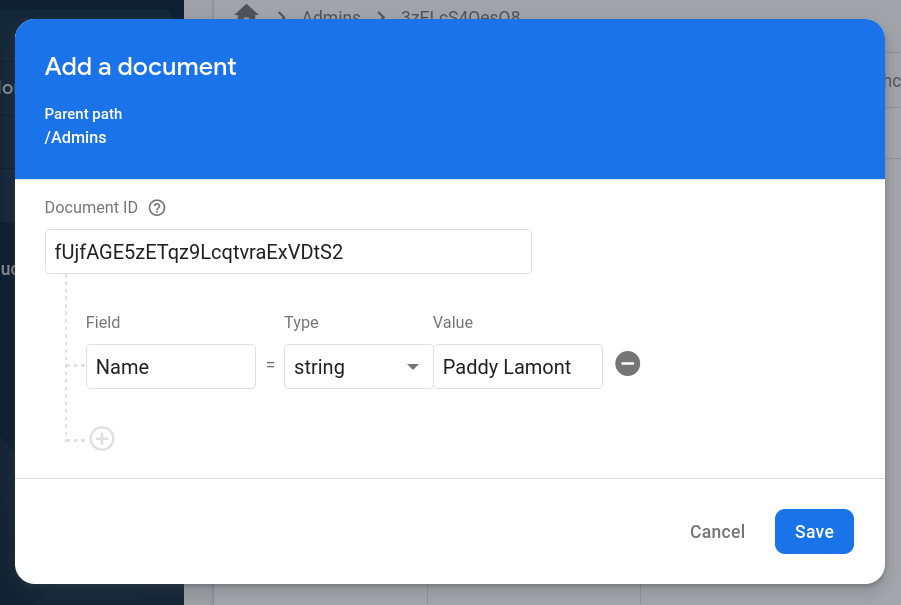
Step 2: You must now fill in a form with the information about the administrator you are registering. An example of this form correctly filled in is shown in Figure 11.
You should enter the admin’s User ID as the “Document ID”. Their User ID can be found using the process described under the Finding your User ID section.
Next, you should enter Name under “Field”, and the admin’s name under
“Value”. The “Type” field should be set to string. This name will
later help to keep track of who has been granted administrator privileges.
Once you have set the admin name, save the document to the Admin collection.
Step 3: The admin that you registered should now be able to reload the admin dashboard and the admin permission error should be gone. They may now upload and manage studies as described under the Managing Studies documentation!
Back to Top